How to add subtitles to AVI video – A tutorial
Recently, I downloaded a video off the Internet that was in Hindi and needed to add English subtitles to the video so that I could share it with some friends. I checked out Windows Movie Maker, which is installed by default in Windows XP SP2 and has the ability to overlay text on video, but the feature set was very poor and it was nearly impossible to control where the subtitles showed up, for how long, and in what kind of format.
Another problem with Windows Movie Maker is that you can’t create subtitles that show up as an option in DVD players, it’s either there or not. After doing some research, I found that the best way to add subtitles to a video semi-professionally is to use a combination of programs, one that specializes in creating high-quality subtitles that match your video exactly and another program that takes a subtitle file and a video and combine them together.
So here’s a guide that will teach you how to add subtitles to videos for free and hopefully not make you completely frustrated! As a prerequisite, you should have some basic technical knowledge of computers and software.
To get started, you first need to download and install several applications. It may seem like a lot of applications, but anywhere tutorial you search for adding subtitles to videos will include most of these apps. Luckily, there is one program that combines many of the separate apps into one, thus making it a lot simpler to use.
Download and unzip Subtitle Workshop
Download and installed Auto Gordian Knot
When you install Auto Gordian Knot, you’ll notice it brings up several install wizards, each corresponding to a separate application. Just keep installing! Don’t worry, the apps are not very large and do not load when you computer starts or anything like that.
Subtitle Workshop only needs to be unzipped to run, there is no install. Just double click on the SubtiteWorkshop4 icon. This is the first application we will start with. Subtitle Workshop will allow us to add as many subtitles as we want into our video and save that file out as a separate file (our video will remain unaltered at this point).
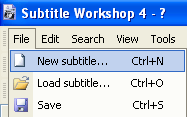
After you open Subtitle Workshop, click on File and choose New Subtitle.
Then go to the Video menu option and choose Open. Choose your video and click Ok and you video will appear in the top section and start playing. Go ahead and move the slide bar to the location where you want your first subtitle to appear and then click on the No. 1 subtitle in the center box.
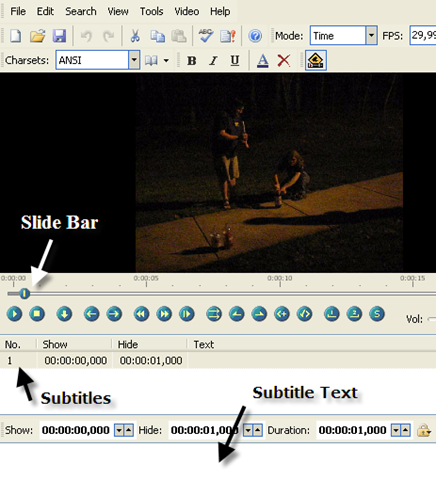
To add your subtitle, begin typing your text into the text box at the bottom. You should see it appear on the video as you type. Now when you add subtitles, you’ll see that there is a Show and Hide section visible in the above screenshot. You have to type in the exact times that you want the subtitles to appear, it does not just pick it up from the location that you are in the video.
In order to get the current frame that you are in while playing the video, look at the right side of the screen below the video. You’ll see those numbers just like they are in the Show/Hide boxes. Just take the value from the top one and add that into the Show box. For example, I want my first subtitle to come up 5 seconds into the video and last 5 seconds.

So I can either type in 00:00:05:000 into the Show box or I can get down to a very specific frame by typing moving the slide bar to the exact location (or pausing at the exact time) and then copying the value shown at the top right into my box. Then simply adjust the Duration value to however long you want the subtitles to remain on the screen! It is defaulted to one, so just change it to 5 or whatever.
So I can either type in 00:00:05:000 into the Show box or I can get down to a very specific frame by typing moving the slide bar to the exact location (or pausing at the exact time) and then copying the value shown at the top right into my box. Then simply adjust the Duration value to however long you want the subtitles to remain on the screen! It is defaulted to one, so just change it to 5 or whatever.
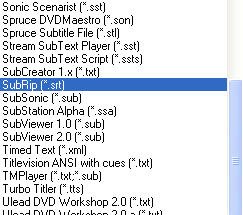
Once you have put all of your subtitles in, go ahead and click on File and then Save. In the Save as type box, scroll down toSubRip (.srt) and save the file in that format.
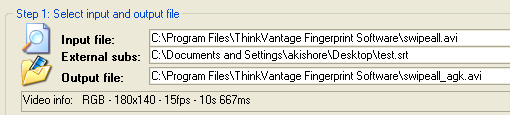
Now close out Subtitle Workshop and open up Auto Gordian Knot. For the Input File, browse and select your video. Next, pressCNTRL + F8 and you’ll see a new option appear called External Subs. Go ahead and browse and select the SRT file we just saved out.
Now choose Target quality for Output size and choose a quality that suits you. I left it at 75 percent. Next click on Advanced Settings and choose XviD or DivX for the codec. If the process does not work for one, use the other codec and try again.
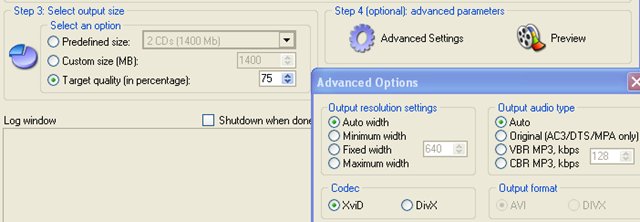
Now click Add Job and then click Start to get your subtitles added on to your video!

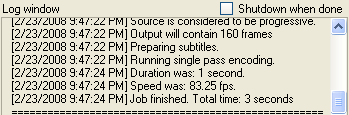
The Log window on the left will detail out all of the processing that is going on with your file. It will also auto-load all of those other applications that it needs in order to burn your subtitles onto the video file. When you do this for the first time, you need to watch out for some license agreement that pops up and accept it otherwise it seems like the program is just stuck, when it’s really not! The program is very fast and you’ll see the Job Finished message when it’s complete.
And that’s it! As if that was very easy!

0 comments:
Post a Comment